
Appointments & Scheduling
Manage clinic calendars, schedule visits, configure dynamic Kanban boards, set up practitioner timetables, and handle patient check-ins.
The Appointment module is the central scheduling engine of Medaius. It coordinates patient visits, manages provider timetables, calculates real-time booking availability, and connects front-desk reception seamlessly to the clinical encounter queue. This guide covers viewing appointment boards, scheduling visits with the 4-step wizard, managing patient check-ins, configuring provider availability, and enabling public online bookings.
Accessing Appointments
To open the scheduling workspace:
- Click Appointments in the left sidebar navigation (
/appointments?view=board). - Use the segmented view toggle in the top bar to switch between:
- Board View: A Kanban-style staging board optimized for daily clinic flow and front-desk reception.
- Calendar View: A comprehensive monthly grid showing scheduled density and provider agendas.
The Appointment Lifecycle & FHIR Statuses
Every appointment in Medaius follows standardized FHIR-compliant lifecycle states:
proposed/pending: An appointment requested by a patient or submitted via online booking, awaiting clinic staff confirmation.booked: A confirmed visit scheduled on the practitioner's calendar.arrived: The patient has physically arrived at the clinic. Marking an appointment as arrived alerts nursing staff and places the patient into the triage/consultation queue.fulfilled: The clinical visit has been completed and the provider has finalized the encounter documentation.cancelled: The visit was cancelled by the patient or clinic (recorded with a status reason code).noshow: The patient missed their scheduled appointment without prior notice.
Board View (Dynamic Kanban Desk)
The Board View is designed for day-to-day front-desk reception. It categorizes appointments into operational columns:
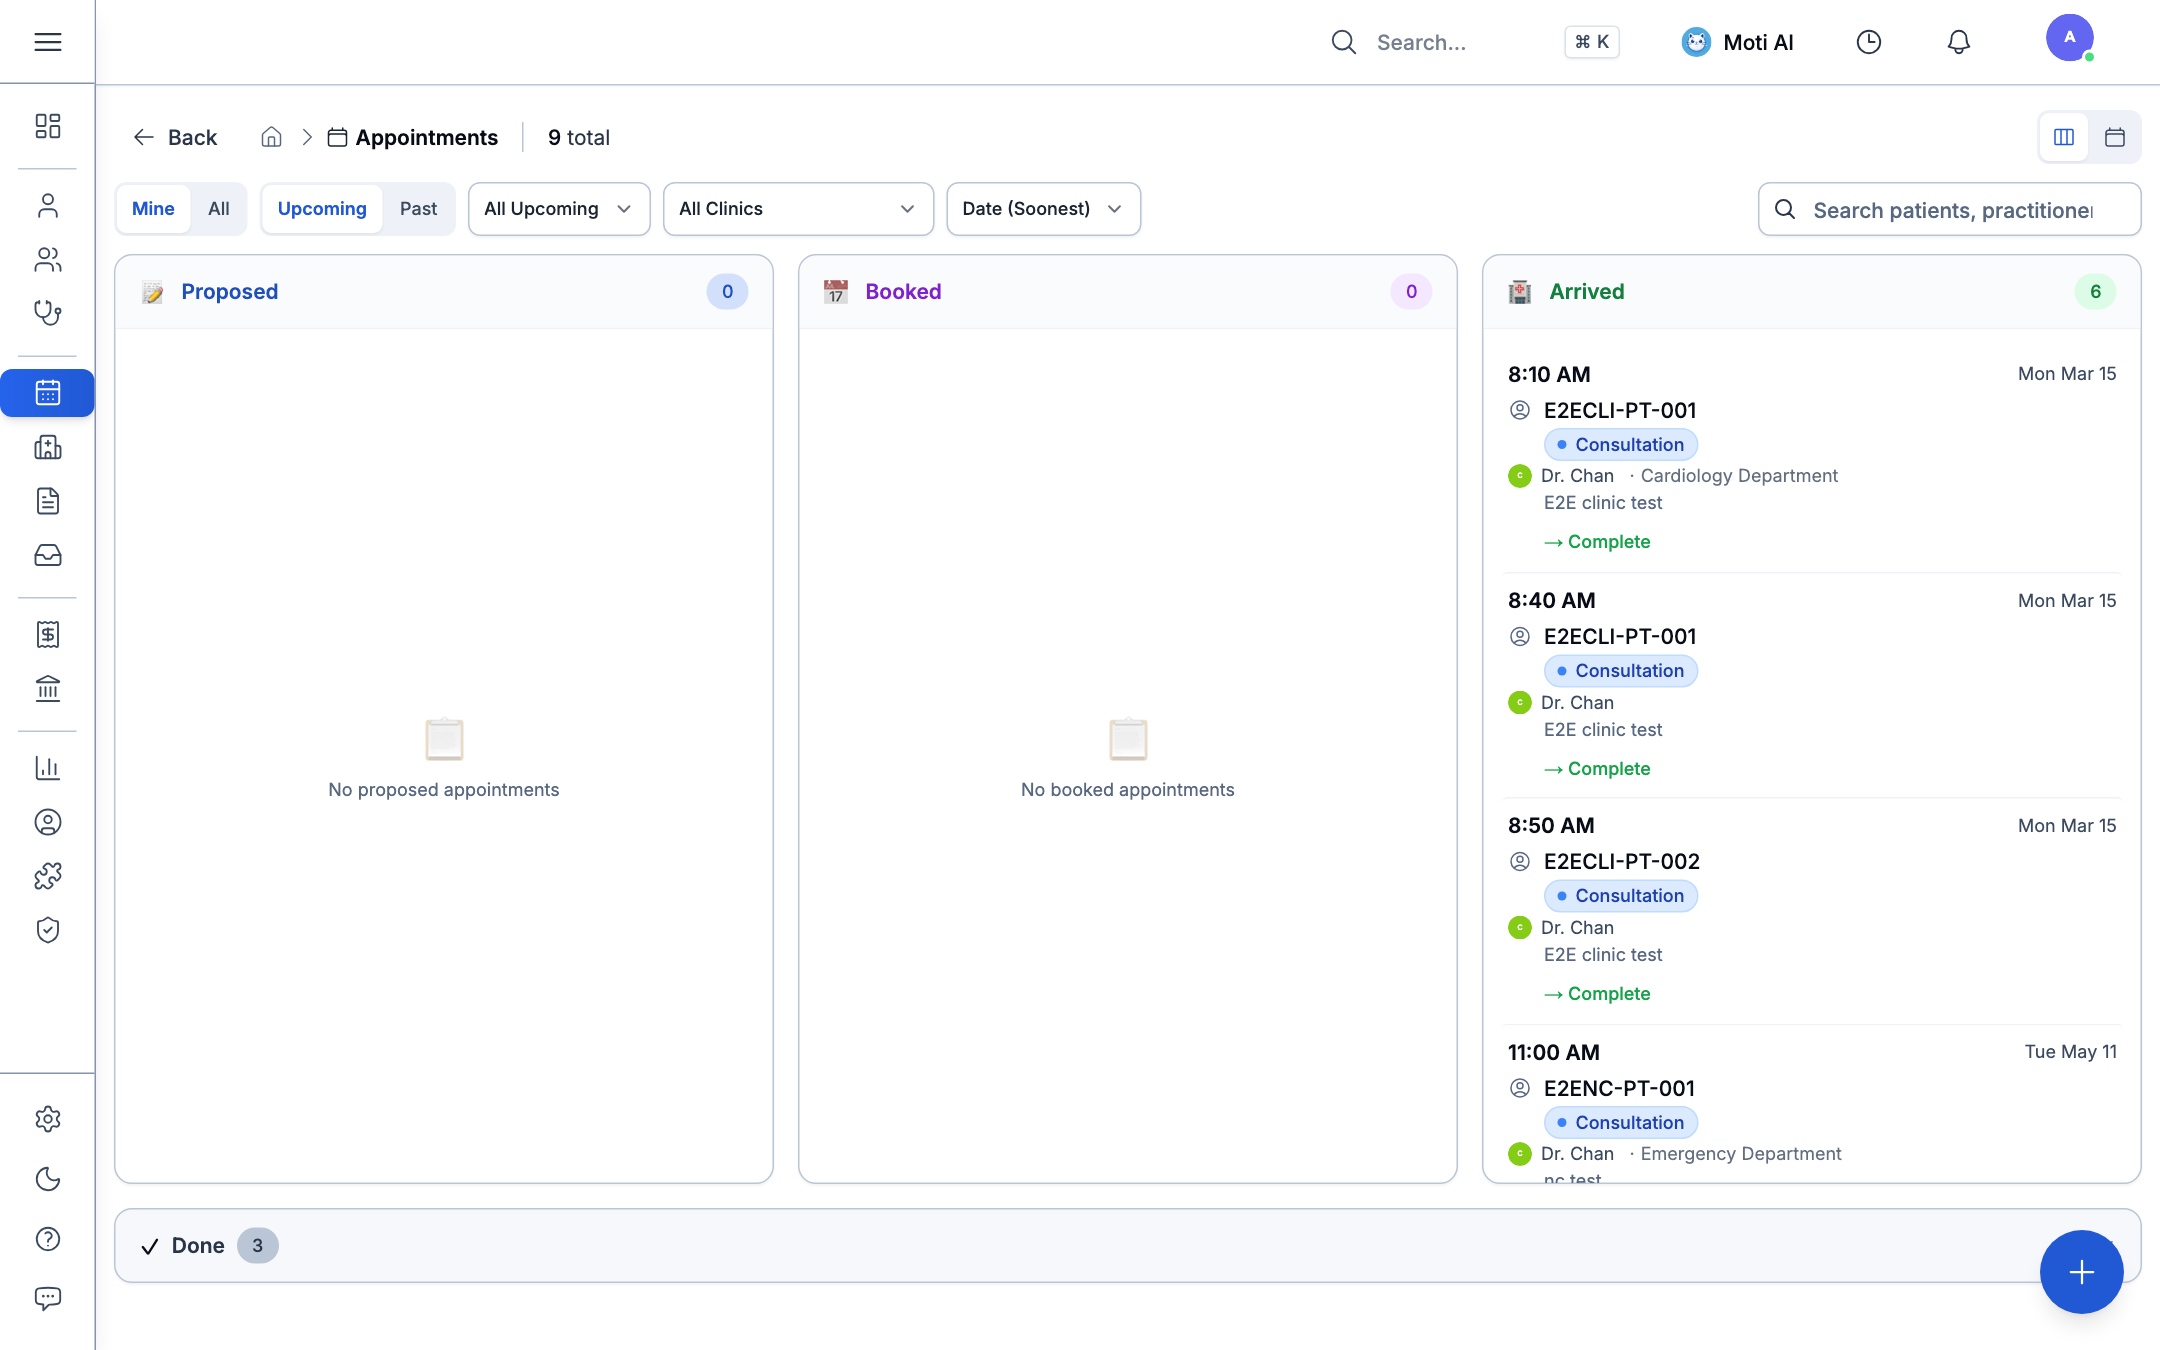
Dynamic Columns & Auto-Confirm Engine
The columns displayed on the board dynamically adapt based on your clinic's Auto-Confirm setting (configured under Admin > Config > Appointment Settings):
Mode A: Auto-Confirm Enabled (Standard Outpatient Flow)
When auto-confirm is enabled, all new bookings are treated as confirmed immediately:
- Booked Column: Displays all scheduled visits (including
booked,proposed, andpending). Staff can click → Check in as patients arrive. - Arrived Column: Displays patients who have arrived and are waiting for triage or doctor consultation.
- Cancelled Column: Shows cancelled visits and no-shows for the day.
- Done Section (Collapsible): Completed encounters (
fulfilled).
Mode B: Auto-Confirm Disabled (Triaged / Approval Flow)
When auto-confirm is disabled, reception must review requests before confirming:
- Proposed Column: Displays inbound requests. Staff review details and click → Confirm to accept.
- Booked Column: Displays confirmed appointments. Staff click → Check in on arrival.
- Arrived Column: Displays patients waiting in the clinic.
- Done Section (Collapsible): Completed (
fulfilled), cancelled, and no-show records.
Appointment Cards & Quick Actions
Each card on the board surfaces essential information at a glance:
- Time & Date: Scheduled start time and day badge.
- Patient Identifier: Patient display name and shorthand chart ID.
- Practitioner & Clinic: Provider avatar, name, and assigned clinic room/branch.
- Type & Modality: Appointment type badge (e.g., General Consultation, Follow-up) and Telehealth video indicator.
- Chief Complaint: Brief description of the visit's purpose.
- One-Tap Actions:
→ Confirm: Approves a proposed booking.→ Check in: Marks the patient as arrived and queues them for clinical triage.→ Complete: Directly marks the visit fulfilled if no documentation is required.
- Status Change Audit Attribution: Shows who modified the appointment status and when (e.g., "Arrived by Dr. San Win • 10:30 AM").
Appointment Detail Drawer
Clicking any appointment card opens the comprehensive slide-over drawer:
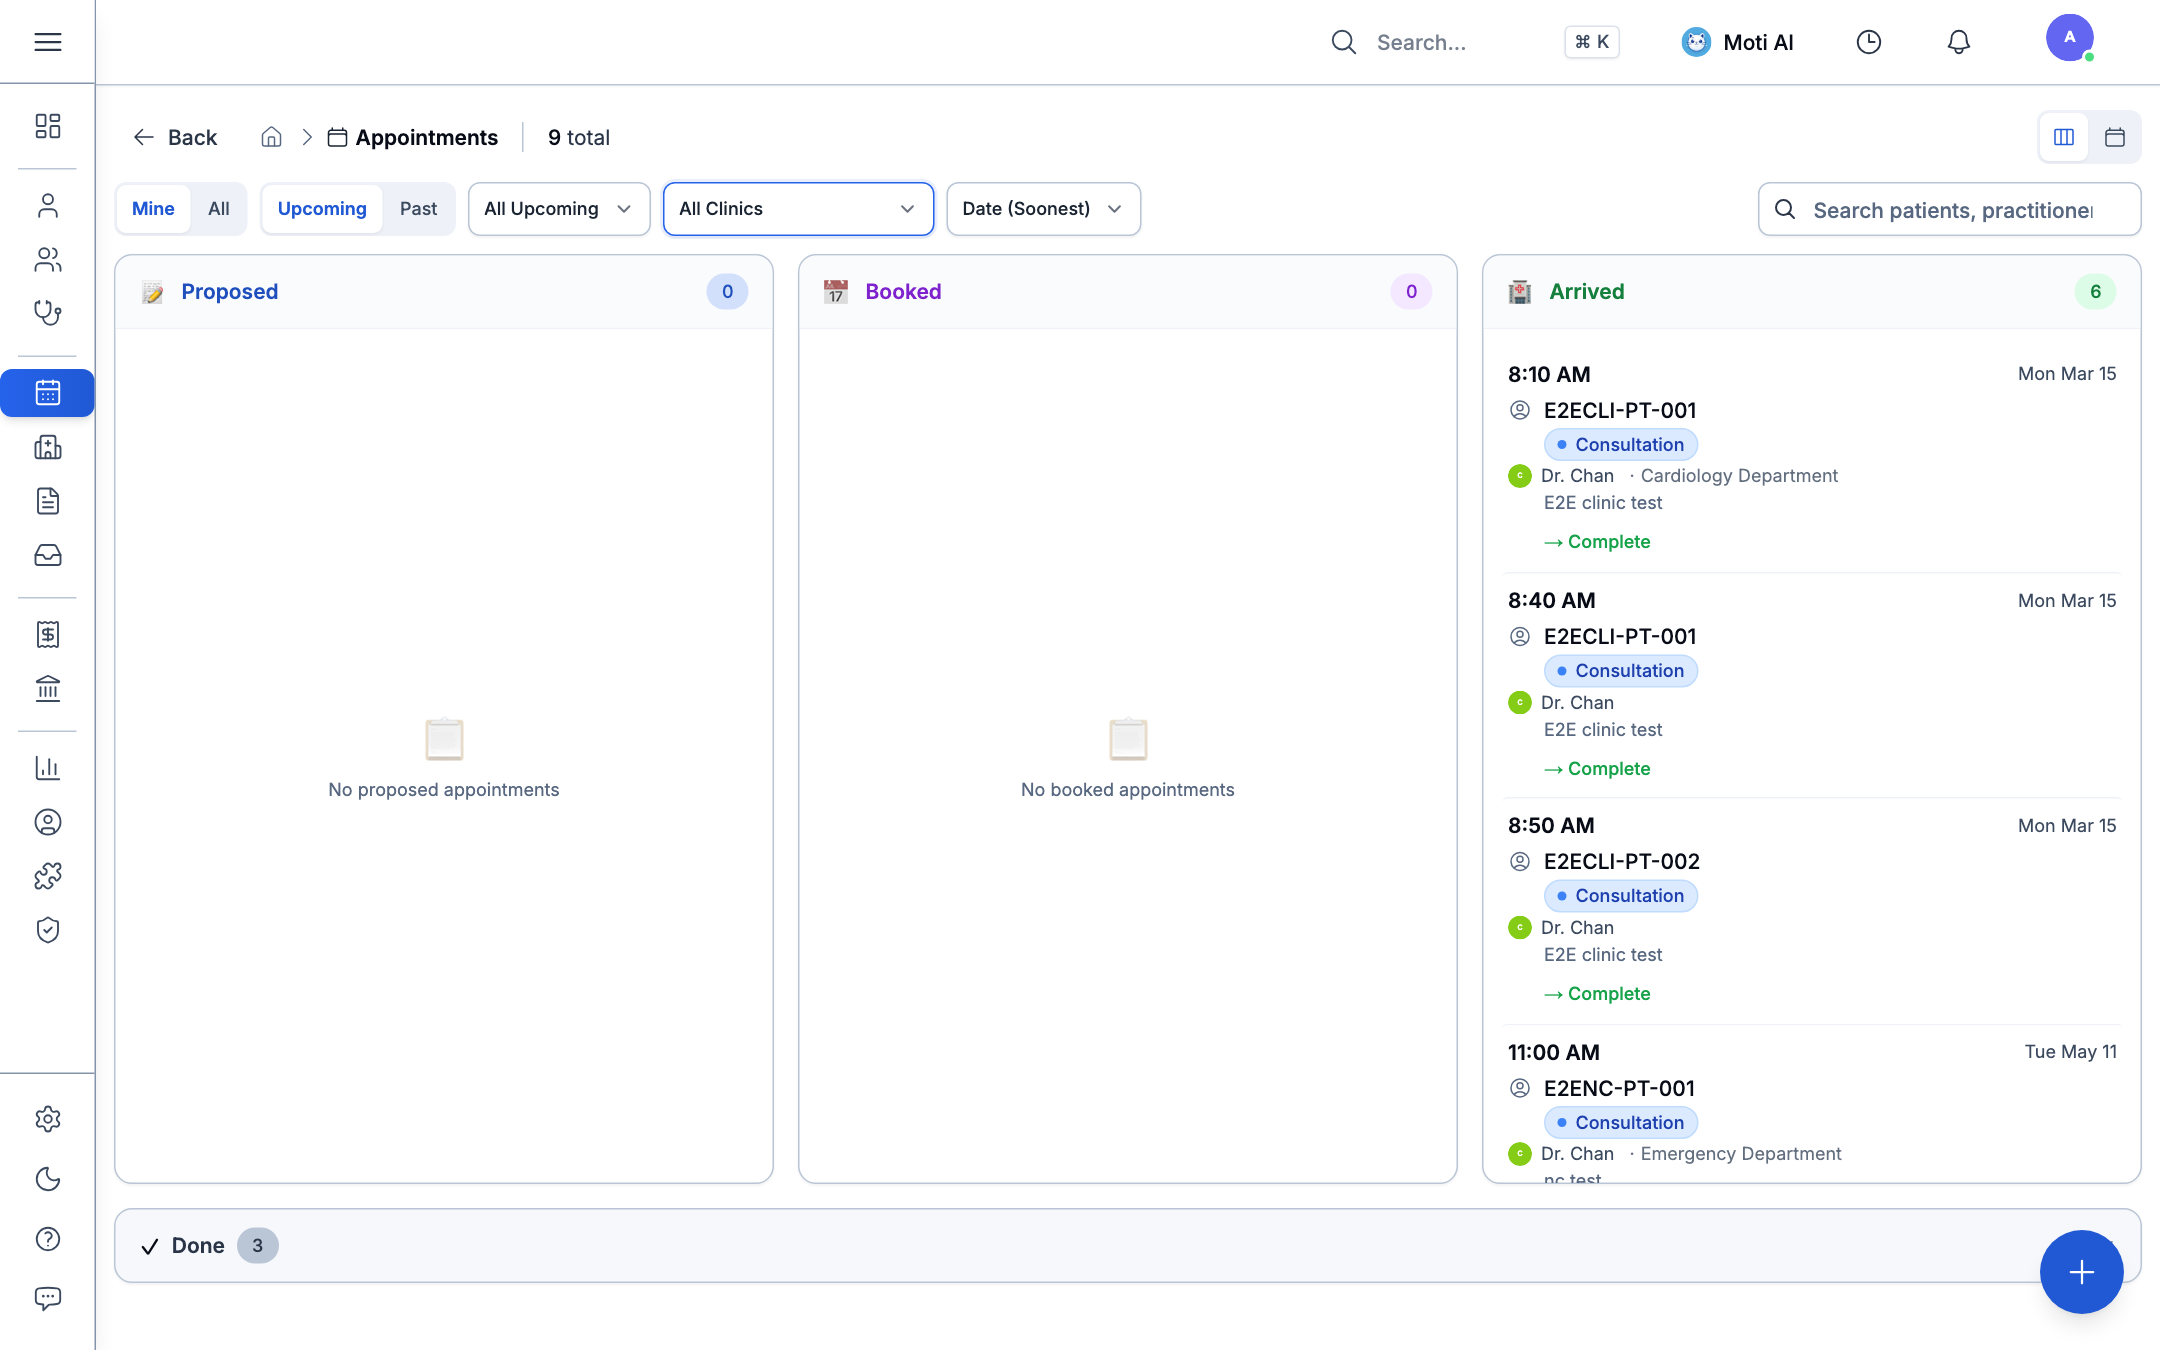
From this drawer, reception and clinical staff can:
- Start Encounter: Launches directly into the Encounter Workbench.
- Reschedule: Adjust date, provider, or slot interval.
- Cancel Appointment: Logs cancellation with required reason codes.
- Status History: Audit trail showing the timeline of who changed the appointment status and when.
The 4-Step Booking Wizard
To book an appointment inside the clinic workspace:
- Click + New Appointment in the top action bar (or click Book Appointment directly from any patient's chart).
- The booking wizard guides you through four sequential steps:
Step 1: Select Practitioner or Clinic
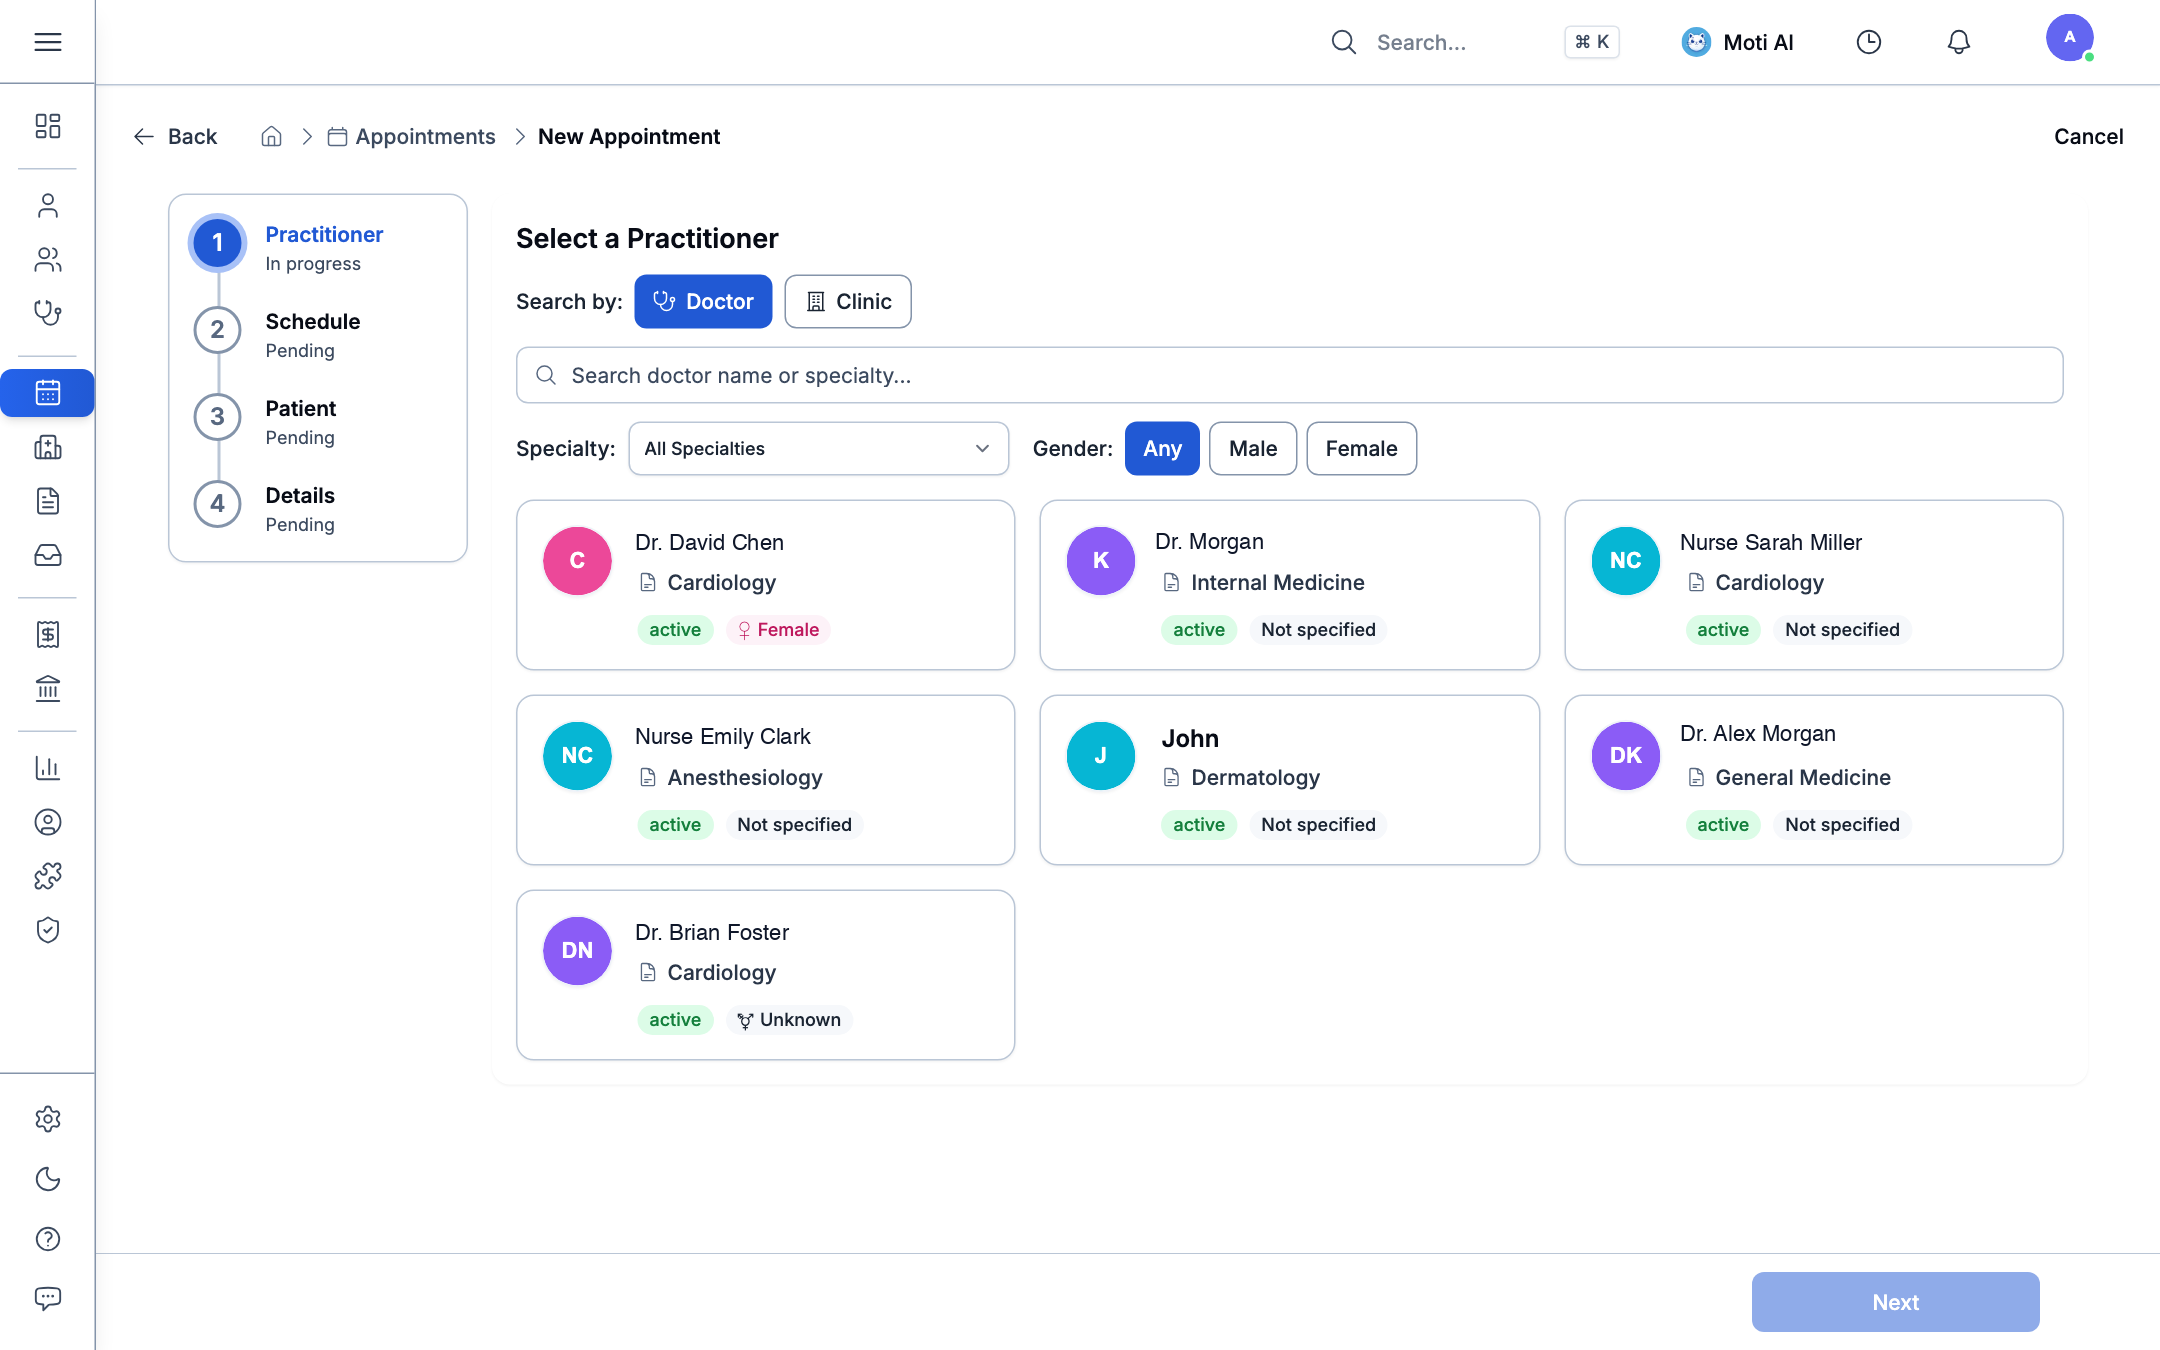
- Search Mode:
- By Doctor: Search and select an individual physician, specialist, or practitioner.
- By Clinic: Select a physical clinic room, department, or consultation booth.
- Filters: Filter providers by clinical specialty (e.g., Cardiology, Dermatology, Pediatrics) and gender.
Step 2: Choose Date & Time Slot
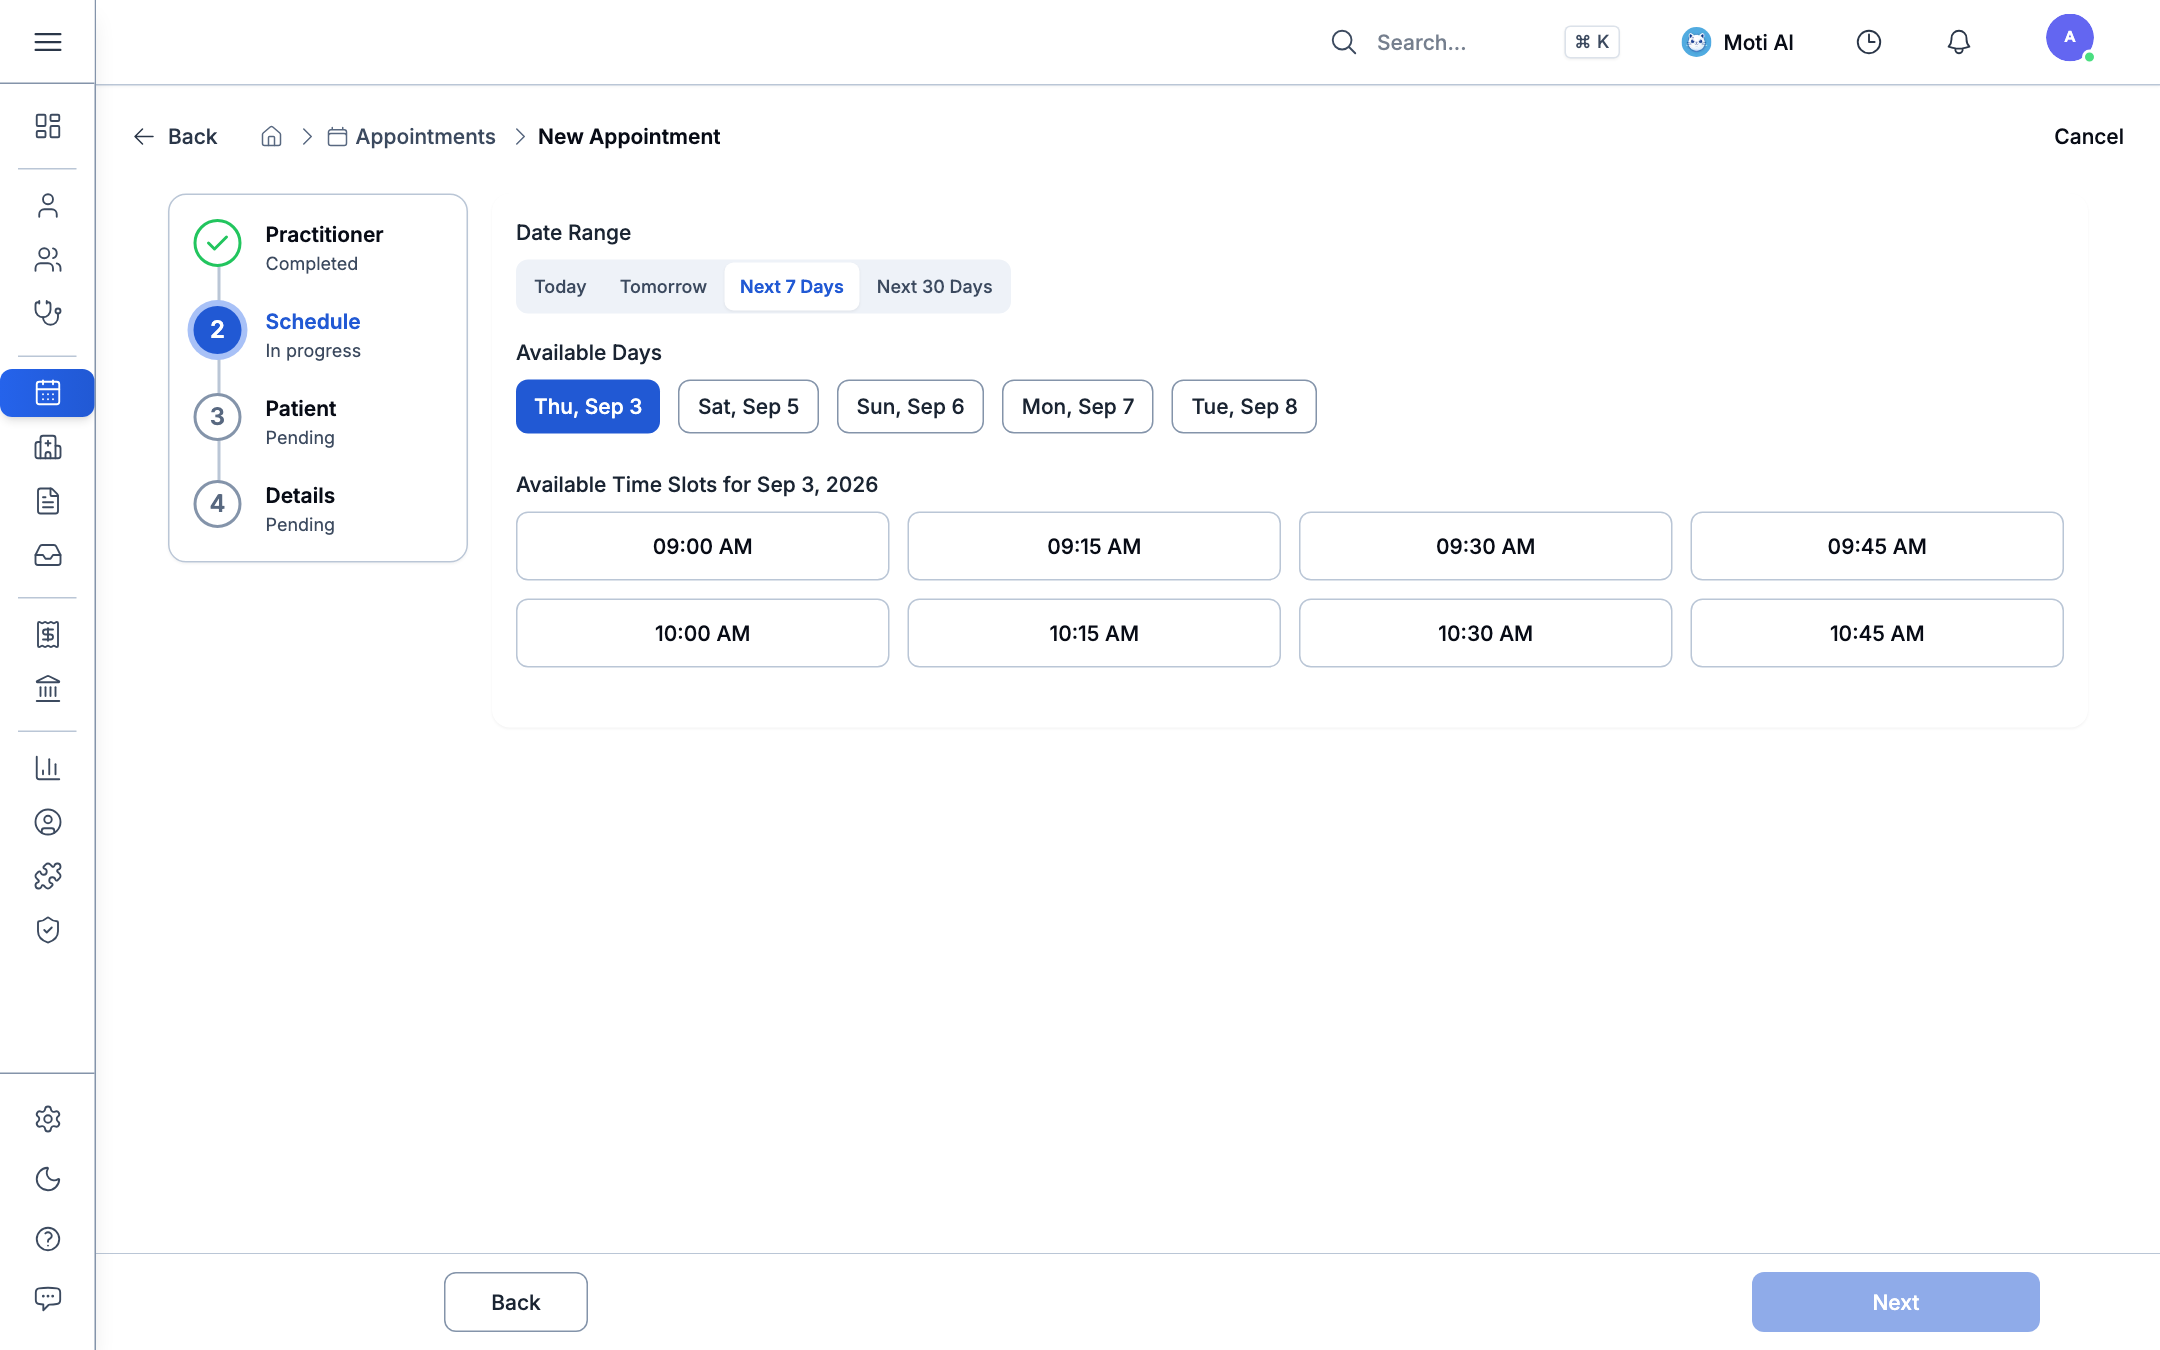
- Select a date on the calendar.
- The system's Dynamic Slot Engine calculates and displays available time slots in real-time based on the provider's active working timetable, duration rules, and break buffers.
- Booked, conflicting, or approved leave slots are automatically blocked from selection.
Step 3: Select Patient (Auto-Skipped from Patient Profile)
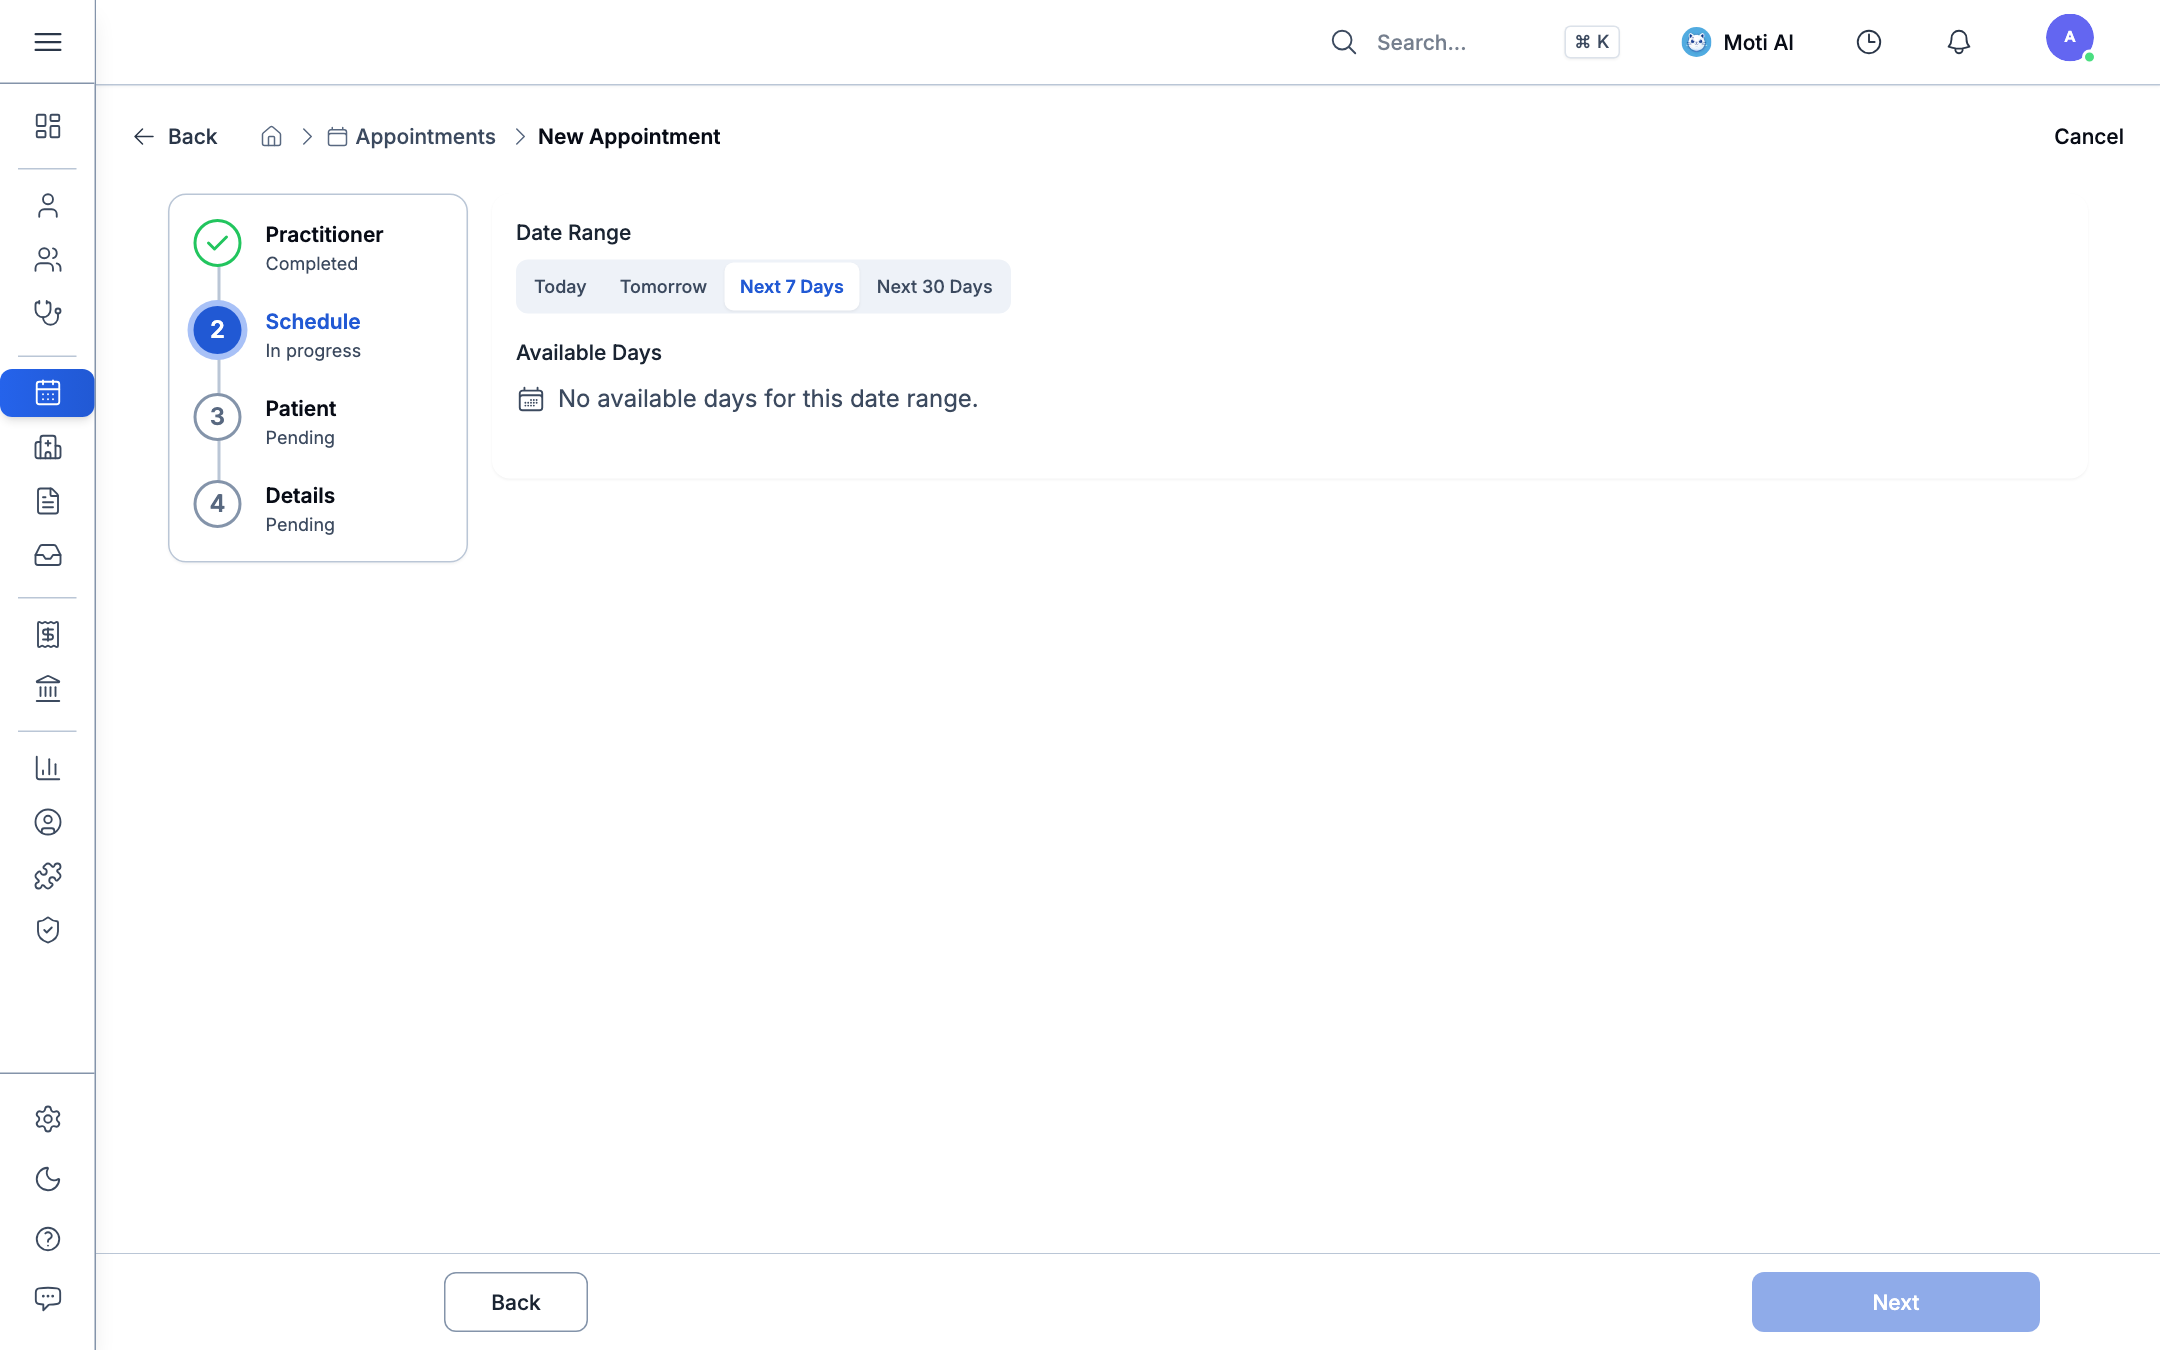
- Search registered patients by name (e.g., Alex Morgan, Sarah Chen), phone number, or chart ID.
- Inline Patient Registration: If the patient is new, click Register New Patient to capture basic demographics without leaving the booking flow.
- Guest Booking: For urgent triage, enter the guest's name and contact number directly.
[!TIP] Smart Patient Context & Auto-Skip: When initiating an appointment directly from a patient's chart (
/patients/[id]→ Book Appointment), the patient is automatically bound. After completing Step 1 (Practitioner/Clinic) and Step 2 (Time Slot), the wizard automatically skips Step 3 and navigates straight to Step 4 (Details & Confirmation).
Step 4: Appointment Details & Confirmation
- Appointment Type: Select visit category (e.g., Initial Consultation, Follow-up Visit, Routine Checkup, Vaccination).
- Telehealth Toggle: Enable virtual video consultation when required.
- Chief Complaint: Enter the primary visit reason or symptoms (automatically transferred into the clinician's draft SOAP note upon arrival).
- Receptionist Notes: Internal coordination notes for nursing or front-desk staff.
- Click Book Appointment to confirm. The scheduled visit immediately appears on the dynamic Kanban board and calendar.
Calendar View (Monthly Grid & Daily Agenda)
For broader capacity planning, switch to Calendar View:
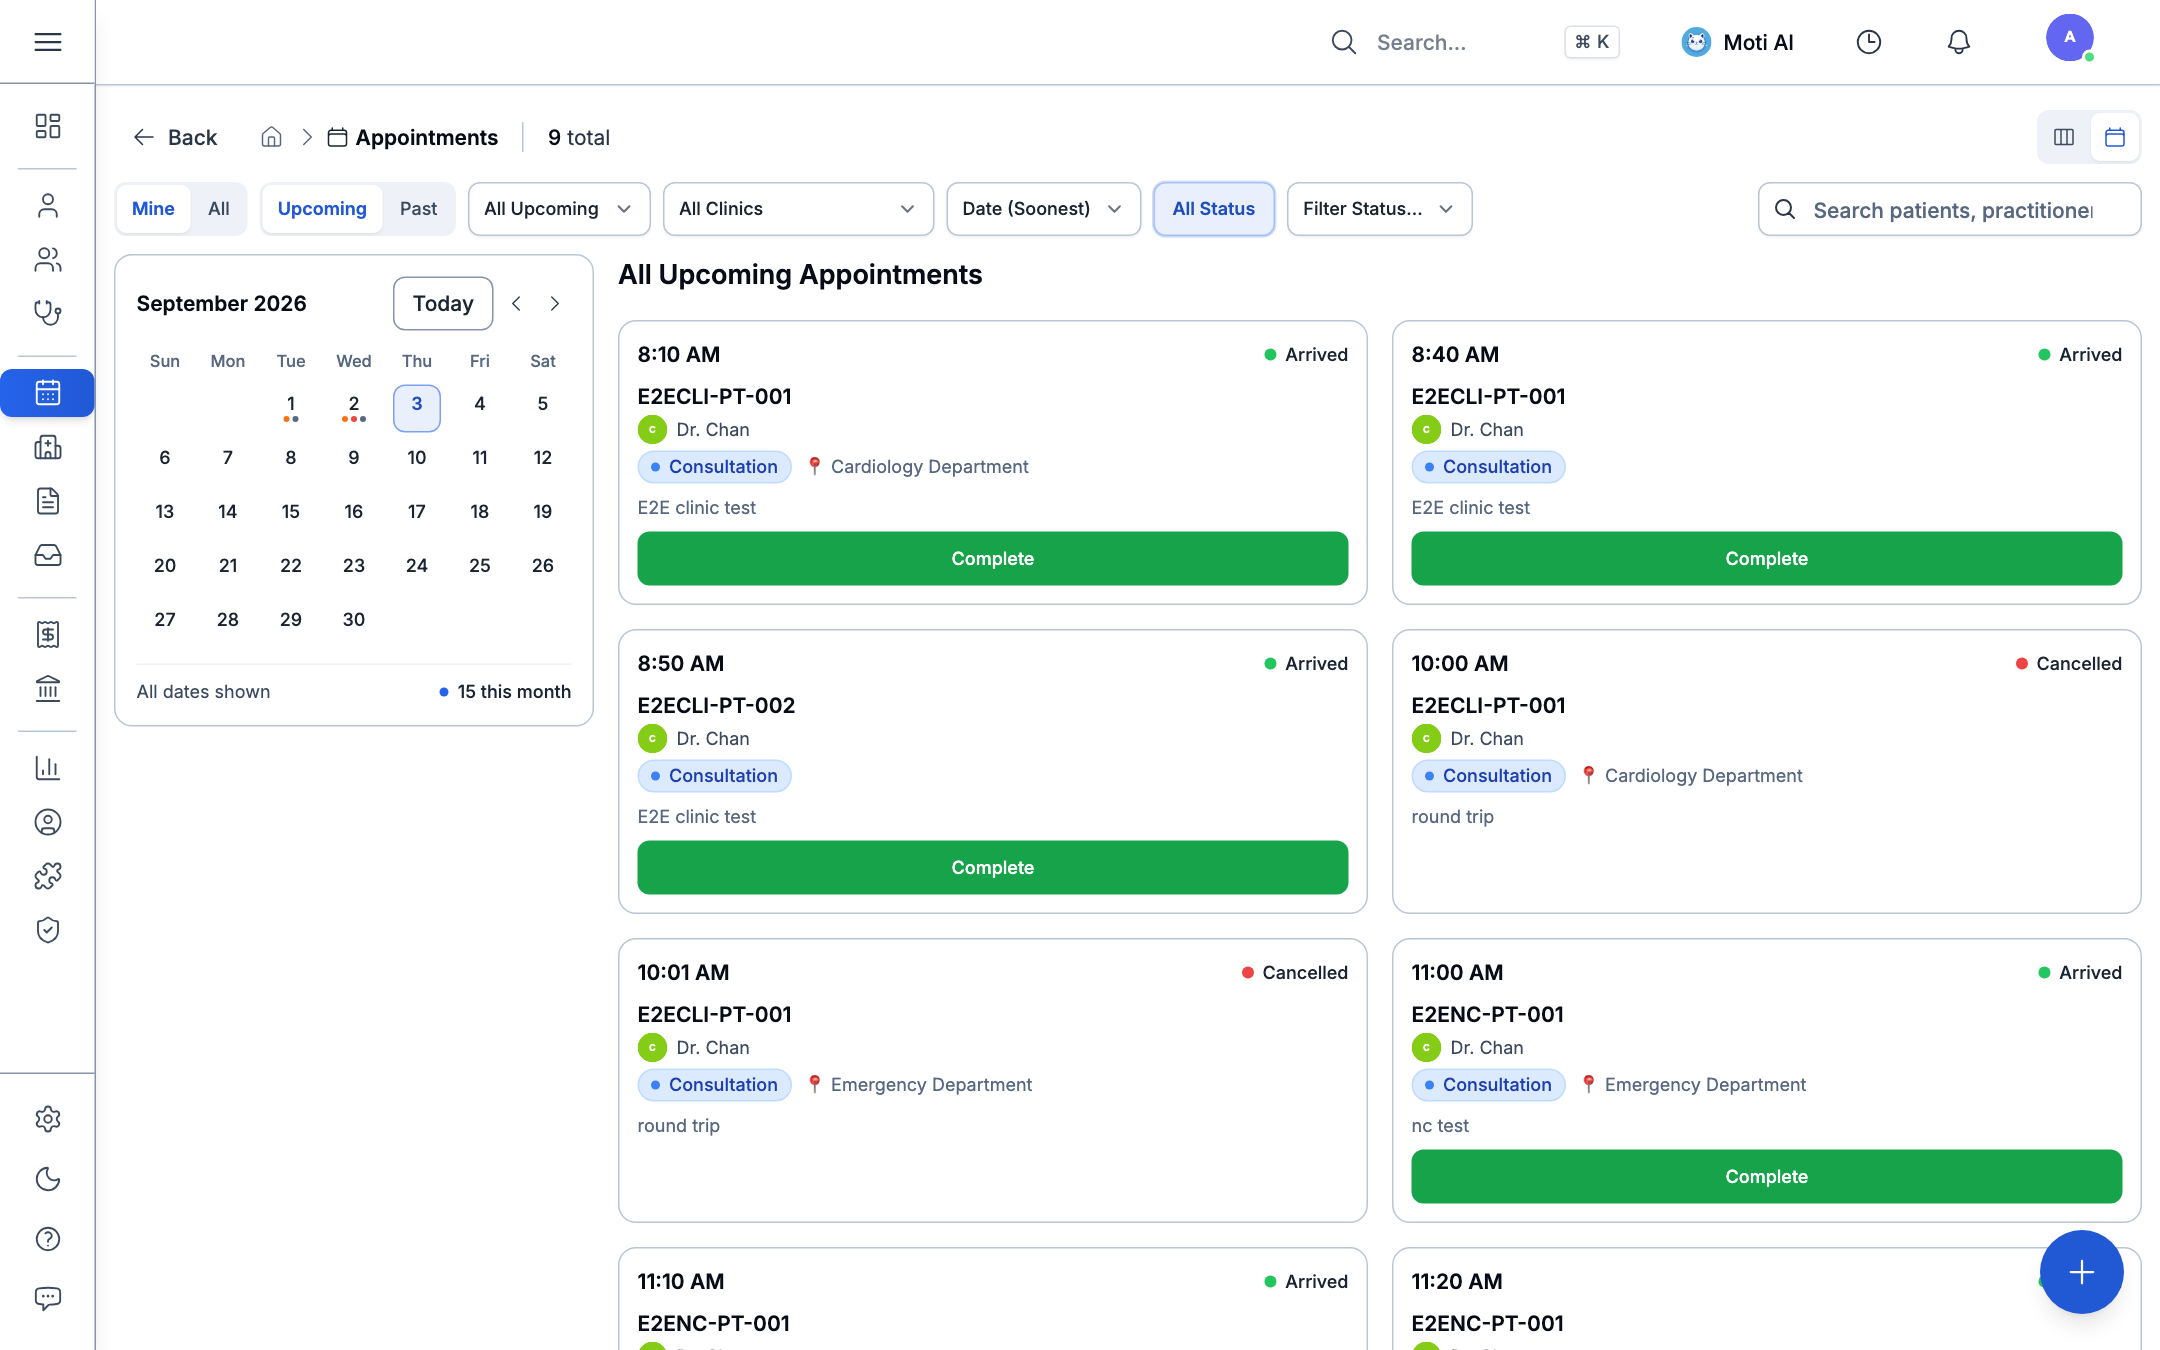
- Monthly Overview: View the entire month at a glance with colored dots representing appointment counts per day.
- Daily Agenda Panel: Clicking any date opens the side agenda panel, listing all appointments scheduled for that specific date ordered chronologically by provider.
- Date Navigation: Jump between months, or click Today to return to current clinic operations.
Managing Practitioner Timetables
To ensure bookable slots appear accurately, practitioners must have active working schedules:
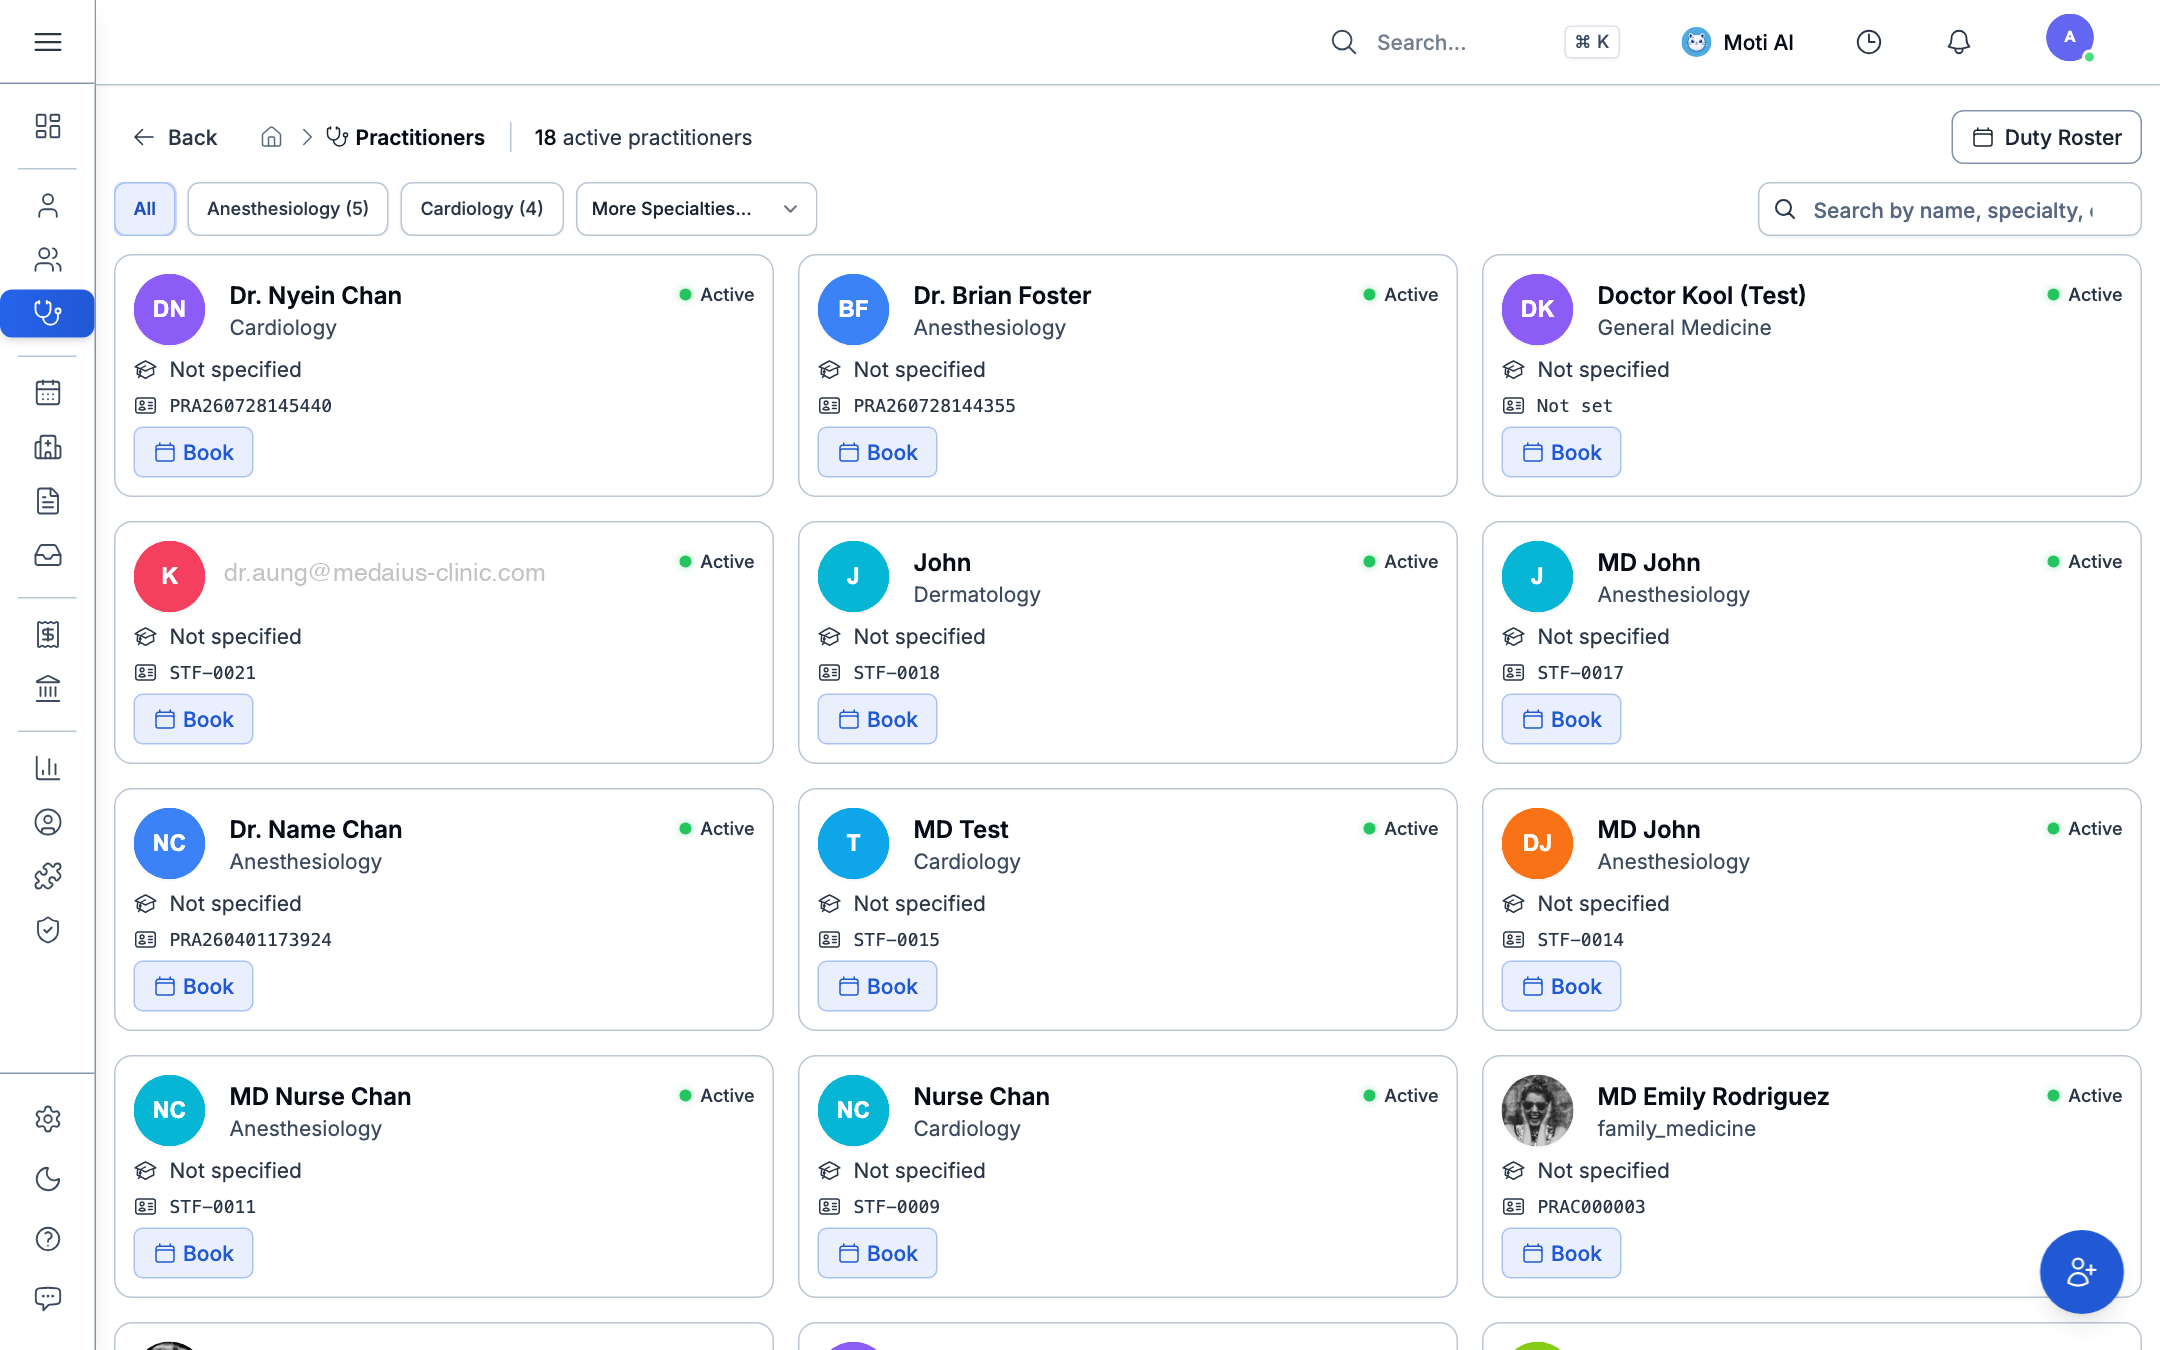
- Navigate to Practitioners in the sidebar (or go to My Profile > Timetable).
- Open the practitioner profile and click Timetable.
- Configure availability:
- Working Days: Select active days of the week (e.g., Monday through Friday).
- Shift Hours: Define daily start and end times (e.g., 09:00 to 17:00).
- Clinic Location: Assign which facility or consultation room the doctor is stationed at for each shift.
- Time-Off & Leave: Block out specific dates or vacation periods to lock slots from being booked.
- Click Save Timetable.
Launching Encounters from Appointments
When a patient is marked as Arrived:
- The consulting doctor or nurse locates the patient on the Board View under the Arrived column.
- Click the appointment card to open the appointment detail drawer.
- Click Start Encounter.
- Medaius automatically:
- Creates a new clinical encounter in Draft status.
- Links the encounter to the patient and practitioner.
- Imports the appointment's Chief Complaint directly into the clinical note draft.
- Launches the Encounter Workbench ready for charting.
Public Online Booking
Clinics can enable self-scheduling for patients:
- Go to Admin > Config > Appointment Settings.
- Enable Public Online Booking and copy your clinic's unique booking URL (
/?org=<org_id>). - Patients visiting the URL can browse doctor timetables, select available slots, and confirm appointments online:
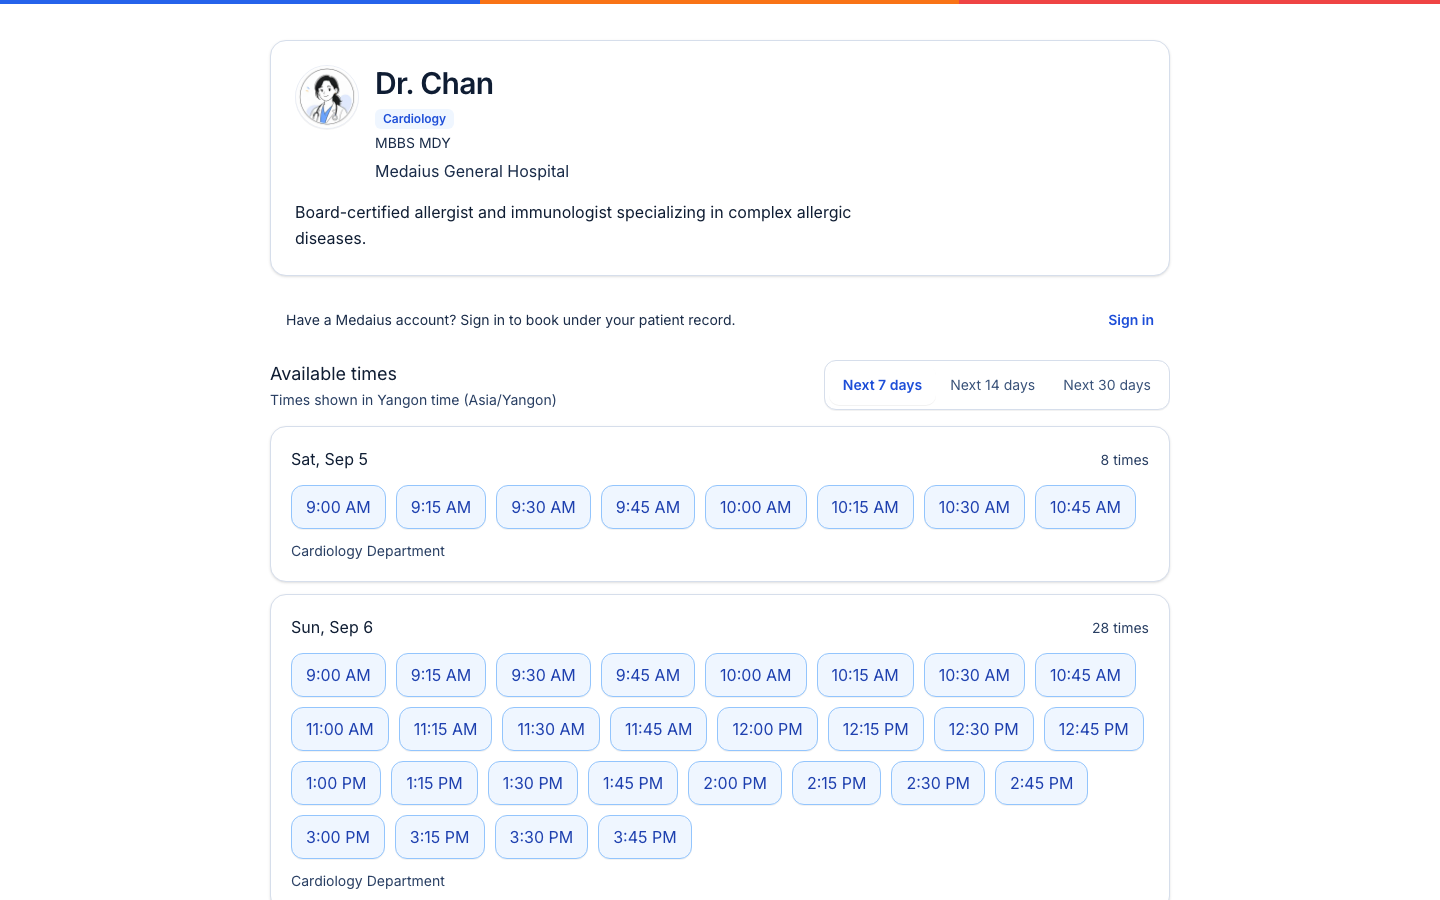
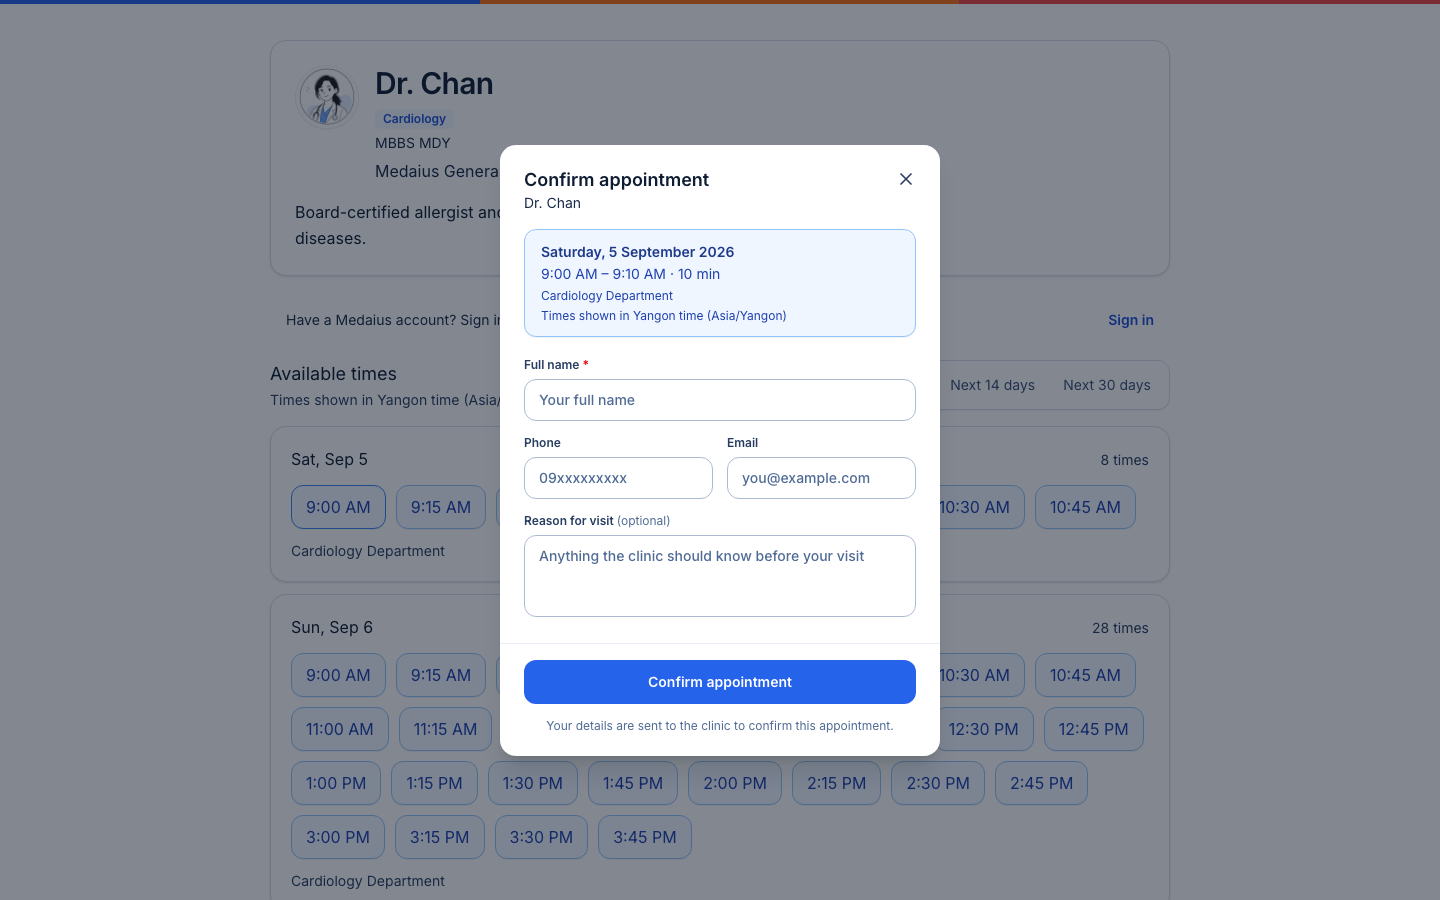
[!TIP] For a complete walkthrough on doctor directories, mobile scheduling, and front-desk triage, see our dedicated Public Online Booking & Timetable Guide.
Was this page helpful?
Help us improve our clinical documentation with your quick feedback.
Longitudinal Patient Clinical Records
Review comprehensive clinical sub-records for patient care: allergies, chronic problem lists, active medications, immunization ledgers, surgical procedures, and diagnostic orders.
Public Online Booking & Timetable
Allow patients to discover doctors, explore published schedules, select available slots, and book visits online via the public patient portal.